
Neem Oil
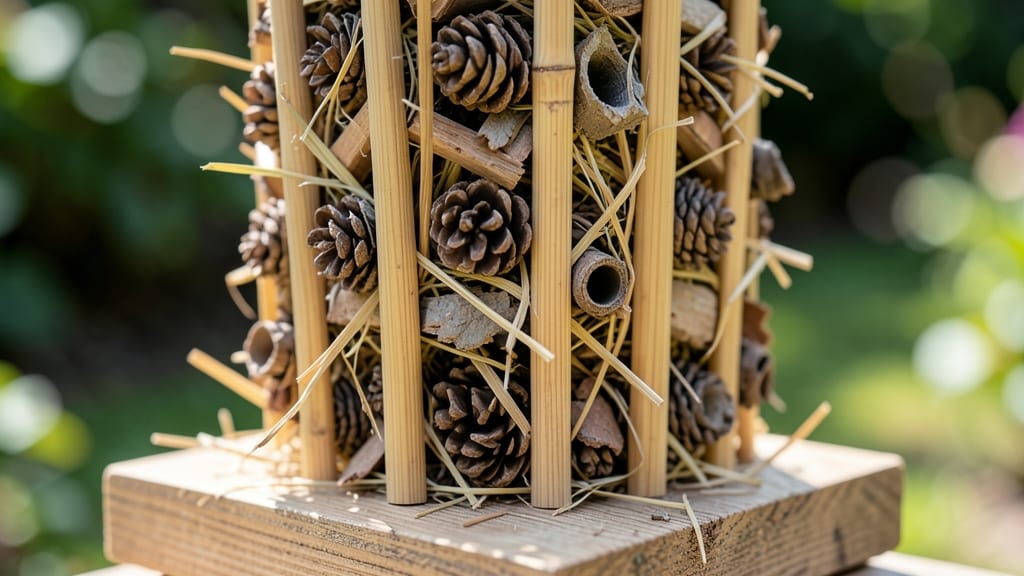
Building a bug hotel transforms your garden into a buzzing sanctuary. 🌿 Last spring, I watched bees and ladybugs move into my first homemade hotel within days—it was like watching a tiny, furry apartment complex come to life.
These little structures aren’t just cute; they’re essential for pollinators struggling to find safe nesting spots.
The magic lies in simple, natural materials: hollow bamboo stems for solitary bees, pinecones for ladybugs, and bundles of twigs for lacewings. You don’t need fancy tools—just a hammer, nails, and an old wooden crate or pallet.
The best part? It takes under an hour to assemble, and the results are immediate: more pollinators, fewer pests, and a garden that thrives.
Once you’ve built it, place your bug hotel in a quiet corner near flowers but away from direct afternoon sun. A little rain won’t hurt—these insects love moisture—but keep it sheltered from heavy storms.
With minimal upkeep, your hotel will stay productive for years, becoming a year-round hub for beneficial insects.
Get creative with designs: stack bricks, use old wine bottles, or even repurpose a birdhouse. The key is variety—different insects need different homes. Watch as your garden becomes a haven, not just for bugs, but for the entire ecosystem that makes your harvests possible.
📚 In This Guide
- What you need
- Instructions
- Tips and common mistakes
- Wrapping up and next steps
What you need
- ● Base Structure: A wooden crate, pallet, or sturdy wooden box (12" x 12" x 24" minimum).
- ● Natural Fillers: Dry leaves, twigs, and pinecones (1-2 cups)
- ● Straw or hay (1 cup)
- ● Bamboo canes or hollow stems (5-10 pieces, 6-12" long)
- ● Small logs or bark (3-5 pieces, 4-6" in diameter)
- ● Insulation: Dry moss, wood shavings, or coconut fiber (1 cup)
- ● Roofing: A piece of wood, slate, or corrugated metal (to keep it dry)
- ● Fasteners: Non-toxic screws, nails, or twine (for assembly)
- ● Saw (if cutting wood)
- ● Hammer or drill
- ● Scissors or pruning shears (for trimming materials)
- ● Measuring tape
- ● Empty egg cartons (for solitary bees)
- ● Cork bark or drilled wooden blocks (for mason bees)
- ● Waterproof paint (non-toxic, for longevity)
- ● Small pebbles or sand (for drainage)
Step-by-Step instructions for building your bug hotel
Here’s how to craft a thriving pollinator haven—simple, sturdy, and packed with creature comforts.
🪴 Step 1: Choose and Prepare Your Base Structure
Start with a wooden crate, pallet, or stacked cinder blocks (4-6 inches deep) as your foundation. I like using untreated cedar or pine—it’s naturally rot-resistant and safe for insects. If using a crate, reinforce the bottom with 1x4 lumber to prevent collapsing. Place it in a shaded, sheltered spot near your garden but away from direct foot traffic—somewhere quiet where bees, solitary wasps, and lacewings can feel secure.
Drill ¼-inch drainage holes along the bottom if your base isn’t naturally ventilated. This prevents waterlogging, which can drown overwintering insects. I add a layer of small stones or bark chips at the bottom first—this creates airflow and mimics natural habitats. Skip the glue or nails; a loose, breathable structure is key for insect occupancy.
🌿 Step 2: Layer Natural Insulation Materials
Fill the base with a mix of dry materials in descending order of coarseness. Start with large pinecones or hollow stems (like elderberry or raspberry canes) at the bottom—they provide shelter for larger pollinators. Next, add bamboo canes or rolled-up corrugated cardboard (cut into 3-inch strips)—these mimic hollow stems where mason bees nest. For smaller insects, layer driftwood, twigs, and hollow reed stems (like those from cattails).
Pack these materials loosely but firmly—you want gaps for airflow but enough density to create cozy nooks. Avoid treated wood or painted materials; chemicals can harm insects. I always include a handful of dried leaves (oak or maple work best) near the top—these provide a natural mulch layer that retains moisture for overwintering species. Leave a 2-inch gap at the top for adding fresh materials later.
💧 Step 3: Add Moisture-Retaining and Nesting Layers
Place a layer of coconut coir or untreated burlap halfway up the structure—this retains moisture for species like hoverflies and ground beetles. Above it, add bundles of straw or dried grass (tie with twine) for solitary bees and lacewings. For extra appeal, include small sections of untreated wood with pre-drilled holes (⅛-inch diameter)—these are perfect for mason bees. I like using old wooden spoons or dowels for this; they’re easy to source and provide just the right size cavities.
Top the structure with a layer of moss or leaf litter—this mimics forest floor conditions and helps regulate humidity. Press lightly but don’t compact it; you want it to stay fluffy enough for tiny insects to burrow into. If your hotel is exposed to rain, add a small overhang (like a piece of flat slate) to shield the top layer from getting waterlogged.
✂️ Step 4: Secure and Decorate for Pollinator Appeal
Cover the entire structure with a lightweight mesh or chicken wire (½-inch grid) to keep materials in place while allowing easy access for insects. Secure it with zip ties or soft wire, leaving a small opening (about 3x3 inches) on one side for maintenance. I like adding a hand-painted sign (with non-toxic paint) to mark the year—it’s a fun way to track which pollinators visit. Place a few small pebbles or sand near the entrance; these attract digger wasps and other ground-nesting species.
Finally, position your bug hotel 6-12 inches off the ground (use bricks or a wooden stand) to protect it from predators like ants and slugs. Face the entrance toward south or southeast to catch morning sun—this encourages early risers like bees to move in. Water lightly around the base (not directly on the structure) to simulate natural dew, which many insects rely on for hydration.
🌱 Step 5: Maintain and Refresh Seasonally
Check your bug hotel once every 3-4 months—spring, summer, and fall are key times. Remove any rotting wood or moldy materials and replace them with fresh ones. I always add a few new pinecones or hollow stems in early spring to attract new tenants. Avoid disturbing the structure too much; many insects are sensitive to vibrations and may abandon their nests if moved.
In late autumn, leave the hotel undisturbed—many pollinators overwinter inside, and disturbing them can be fatal. If you notice cobwebs or debris, gently brush it away with a soft brush rather than hosing it down. By early spring, you’ll likely see tiny holes, mud tubes, or chewed leaves—signs that your hotel is thriving! Add a small dish of water with pebbles nearby to give visiting pollinators a safe drink.
Tips & tricks for building a thriving bug hotel
Creating the perfect habitat for pollinators starts with these thoughtful details that make all the difference.
Location is Everything: The ideal spot combines shade and shelter while avoiding high foot traffic. I’ve found that placing your hotel near flowering plants—especially native species—maximizes its appeal. Early morning sun (south or southeast exposure) helps warm the structure, encouraging bees to emerge in spring. Avoid placing it under drip lines from gutters, as prolonged moisture can lead to mold. A small overhang (like a piece of slate) can protect the top layer from rain without blocking airflow.
Material Selection Matters: Untreated cedar or pine is my go-to for bases because their natural oils deter pests and rot. For nesting materials, prioritize variety—mason bees adore the ⅛-inch holes in wooden spoons or dowels, while solitary wasps prefer the cozy 3-inch strips of corrugated cardboard. Pro tip: Collect materials throughout the year. Hollow stems from elderberry or raspberry canes work best when fresh but can be stored dry until needed. Always avoid treated wood, painted materials, or anything with chemical residues.
Design for Year-Round Occupancy: The layered approach in Step 2 and Step 3 creates microclimates that cater to different species and seasons. For overwintering insects like ladybugs, include a handful of dried oak or maple leaves near the top—they provide insulation and moisture retention. In Step 4, the ½-inch mesh keeps materials secure while allowing easy access for tiny residents. I’ve noticed that adding a few small pebbles or sand near the entrance attracts digger wasps, which are excellent pest controllers for your garden.
Maintenance Without Disruption: When checking your hotel every 3-4 months, focus on replacing only the rotting or moldy materials. I use a soft brush to gently remove cobwebs rather than hosing it down—sudden vibrations can scare away tenants. In late autumn, resist the urge to clean thoroughly; many pollinators overwinter inside, and disturbing them can be fatal. Instead, leave the structure intact until spring, when you’ll see signs of activity like tiny holes or mud tubes—clear indicators your hotel is thriving.
Pro Tips for Build A Bug Hotel
- Creating the perfect habitat for pollinators starts with these thoughtful details that make all the difference.
- Location is Everything: The ideal spot combines shade and shelter while avoiding high foot traffic. I’ve found that p...
- Material Selection Matters: Untreated cedar or pine is my go-to for bases because their natural oils deter pests and ...
Frequently asked questions
Got questions about creating your own bug hotel? You’re not alone! Here are some of the most common queries—and their answers—to help you build with confidence.
What’s the best time of year to build a bug hotel?
Spring or early summer is ideal—just before pollinators like bees and butterflies become most active. Avoid winter, as cold weather can damage materials or deter inhabitants. If you’re in a mild climate, late fall can still work, but prioritize shelter placement to shield from wind and rain.
Will a bug hotel attract pests like mosquitoes or spiders?
Not necessarily! Bug hotels are designed for beneficial insects—bees, ladybugs, and lacewings—that prey on pests. Spiders may visit, but they’re natural pest controllers. Avoid using decaying wood or standing water, which can attract mosquitoes. A well-maintained hotel keeps unwanted critters at bay.
Can I build a bug hotel in an apartment or small yard?
Even a balcony or windowsill works if you use vertical space. Opt for a compact design (like a hanging hotel or wall-mounted unit) and choose lightweight materials. Place it near native plants to maximize pollinator visits. Just ensure it’s stable and safe from extreme weather.
What if my bug hotel gets moldy or damp?
Moisture is the enemy! Elevate your hotel off the ground, use waterproof materials (like untreated wood or bamboo), and add a roof or overhang. If mold appears, dry it out in the sun and replace any soggy fillers (like pinecones or straw). Regular checks in rainy seasons will keep it fresh.
Are there alternatives to natural materials like pinecones or bamboo?
Yes! Recycle clean, untreated materials like cardboard tubes, empty coconut shells, or even old terracotta pots. Just avoid plastic or chemically treated wood. Get creative—driftwood, hollow stems, or even rolled-up newspaper (for solitary bees) work too. The key is variety to attract different species.
Wrapping up and next steps
Building a bug hotel is a rewarding way to support local ecosystems while adding a charming, eco-friendly touch to your garden! 🐝 With just a few simple materials and a little creativity, you’ve created a cozy haven for pollinators and beneficial insects.
Whether you’re a seasoned gardener or a beginner, this project is a fantastic way to make a real difference—one tiny guest at a time.
Now that you’re ready to assemble your bug hotel, why not take it a step further? Expand your garden’s green impact by planting native flowers or exploring other DIY wildlife projects, like a solitary bee house or a butterfly-friendly meadow. Every small action helps our buzzing friends thrive! 🌿